The Ultimate Fusion: Why Homemade Apple Crisp Ice Cream is a Game Changer
Imagine the warmth of a classic apple crisp, its cinnamon-spiced apples tender beneath a buttery, crumbly oat topping. Now, picture that culinary comfort meeting the cool, luscious embrace of creamy vanilla bean ice cream. For many, this pairing is the quintessential autumn dessert, a symphony of textures and temperatures that delights the senses. But what if you could have both in one decadent spoonful? This is the irresistible allure of homemade apple crisp ice cream – a true "best of both worlds" experience that transcends traditional dessert boundaries. If you're searching for an extraordinary Best of Both Worlds: Decadent Apple Crisp Ice Cream Recipe, you've landed in the right place.
The genesis of this frozen delight often stems from a simple, brilliant thought: why choose when you can combine? Like many culinary innovations, the concept of infusing apple crisp directly into ice cream was born from a love for both components. Think of the delightful aroma that fills your home when baking apple crisp – it’s a memory-making scent. Now, capture that essence, along with the tantalizing textures of sweet apples and crunchy streusel, in a chilled, scoopable format. It's not just ice cream; it's a nostalgic journey with every bite, offering a comforting flavor profile married to a refreshing coolness.
Creating this masterpiece at home isn't just about following an apple crisp ice cream recipe; it's about mastering a few key techniques that elevate it from good to absolutely unforgettable. Let's delve into the secrets to unlocking this creamy bliss.
Crafting Your Creamy Canvas: The Vanilla-Cinnamon Ice Cream Base
Every exceptional ice cream begins with an exceptional base. For an apple crisp ice cream recipe, this foundation must be rich, smooth, and perfectly seasoned to complement the apple crisp without overpowering it. A vanilla bean and cinnamon base is the ideal canvas, providing warmth and depth that harmonizes beautifully with the fruit and streusel.
Ingredients for a Perfect Base:
- Dairy: A blend of whole milk and heavy cream creates the luxurious texture. The higher fat content of cream is crucial for creaminess and preventing ice crystal formation.
- Sweetener: Granulated sugar not only sweetens but also contributes to the ice cream's smooth consistency.
- Flavor Infusion: A split vanilla bean (or high-quality vanilla extract for convenience) and ground cinnamon are essential. The vanilla bean offers a more profound, nuanced flavor than extract, while cinnamon ties into the apple crisp theme.
- Binder/Emulsifier: Egg yolks are the secret to a truly decadent, custard-like ice cream. They add richness, body, and help create a smoother, more stable emulsion, preventing a grainy texture. A pinch of salt balances the sweetness and enhances all the flavors.
Steps for a Robust Base:
- Combine & Heat: In a saucepan, combine the milk, cream, sugar, salt, and cinnamon. If using a vanilla bean, scrape the seeds into the pan and add the pod as well. Heat gently over medium heat, stirring occasionally, until the sugar is completely dissolved and the mixture is warm but not boiling.
- Steep for Flavor: Remove the pan from the heat. Cover and let the mixture steep for at least 30 minutes (or longer, up to an hour) to allow the vanilla bean and cinnamon flavors to fully infuse. This step is critical for developing a deep, aromatic base.
- Temper the Yolks: While the base steeps, whisk your egg yolks in a separate bowl. Once the milk mixture has steeped, gradually ladle a small amount of the warm liquid into the egg yolks while continuously whisking. This process, known as tempering, slowly brings the yolks up to temperature, preventing them from scrambling.
- Combine & Thicken: Pour the tempered egg yolk mixture back into the saucepan with the remaining milk mixture. Return the pan to low heat and cook, stirring constantly with a spatula, until the mixture thickens enough to coat the back of a spoon. Do not boil.
- Chill Thoroughly: Strain the custard through a fine-mesh sieve into a clean bowl to remove any solids (like the vanilla bean pod or accidental scrambled egg bits) and ensure a silky-smooth texture. Cover the bowl and chill completely in the refrigerator for at least 4-6 hours, or preferably overnight. A well-chilled base is paramount for optimal churning and a creamy end product.
The Heart of the Matter: Integrating the Apple Crisp
This is where the magic truly happens – transforming a standalone dessert into a magnificent ice cream inclusion. The reference context highlights a crucial point: using an *actual* apple crisp is vital for authentic flavor. Attempts to mimic it with separate baked apples and streusel often fall short of the genuine, comforting taste. For those looking to Skip the Pie: Easy Homemade Apple Crisp Ice Cream Delight and jump straight to the ice cream, ensuring your crisp is perfect is key.
Preparing Your Apple Crisp for Infusion:
- Choose Your Crisp: You can use your favorite apple crisp recipe. The ideal crisp will have tender, flavorful apples and a robust, slightly crumbly oat topping. Many find crisps easier to make than pies, making them a convenient choice.
- Cool Completely: This step cannot be stressed enough. Your apple crisp must be completely cooled to room temperature, or even slightly chilled, before it comes anywhere near your ice cream base. Adding warm crisp will melt the churning ice cream, resulting in an icy, unappealing texture.
- Chop Precisely: The size of your apple crisp pieces is paramount. Chop approximately 2 to 2.5 cups of cooled apple crisp into small, uniform pieces – think pea-sized to small lentil-sized. Avoid large chunks, especially of apple, as these will freeze solid and become unpleasantly icy and hard to chew in the finished ice cream. Smaller pieces distribute better and maintain a more pleasant texture when frozen.
Mixing it In:
Once your ice cream base is thoroughly chilled, churn it in your ice cream maker according to the manufacturer's instructions. This usually takes about 10-25 minutes, depending on your machine, until it reaches the consistency of soft-serve ice cream. At this stage, it's perfectly churned but not fully frozen.
Now, gently fold in the finely chopped apple crisp. You can do this either in the ice cream machine during the last minute or two of churning, or by hand in a separate bowl immediately after the ice cream finishes spinning. The goal is to distribute the crisp evenly without overmixing, which could deflate the ice cream.
Once the apple crisp is incorporated, transfer the ice cream to an airtight container and freeze for at least 4-6 hours, or preferably overnight, to allow it to firm up to a scoopable consistency and for the flavors to fully meld.
Tips for Perfection: Serving and Storing Your Homemade Masterpiece
You've put in the effort, now let's ensure you enjoy every last spoonful of your homemade apple crisp ice cream recipe creation to its fullest potential.
Serving Suggestions:
- The Resting Period: This is a non-negotiable step for optimal enjoyment. Before serving, remove the ice cream from the freezer and let it sit on the counter for 5 to 10 minutes. This resting time allows the small apple pieces to warm up slightly and soften, transforming them from hard, icy bits into tender, chewy morsels. It also makes the ice cream easier to scoop and enhances its creamy texture.
- Pure Delight: Serve it simply in a bowl, letting the flavors speak for themselves.
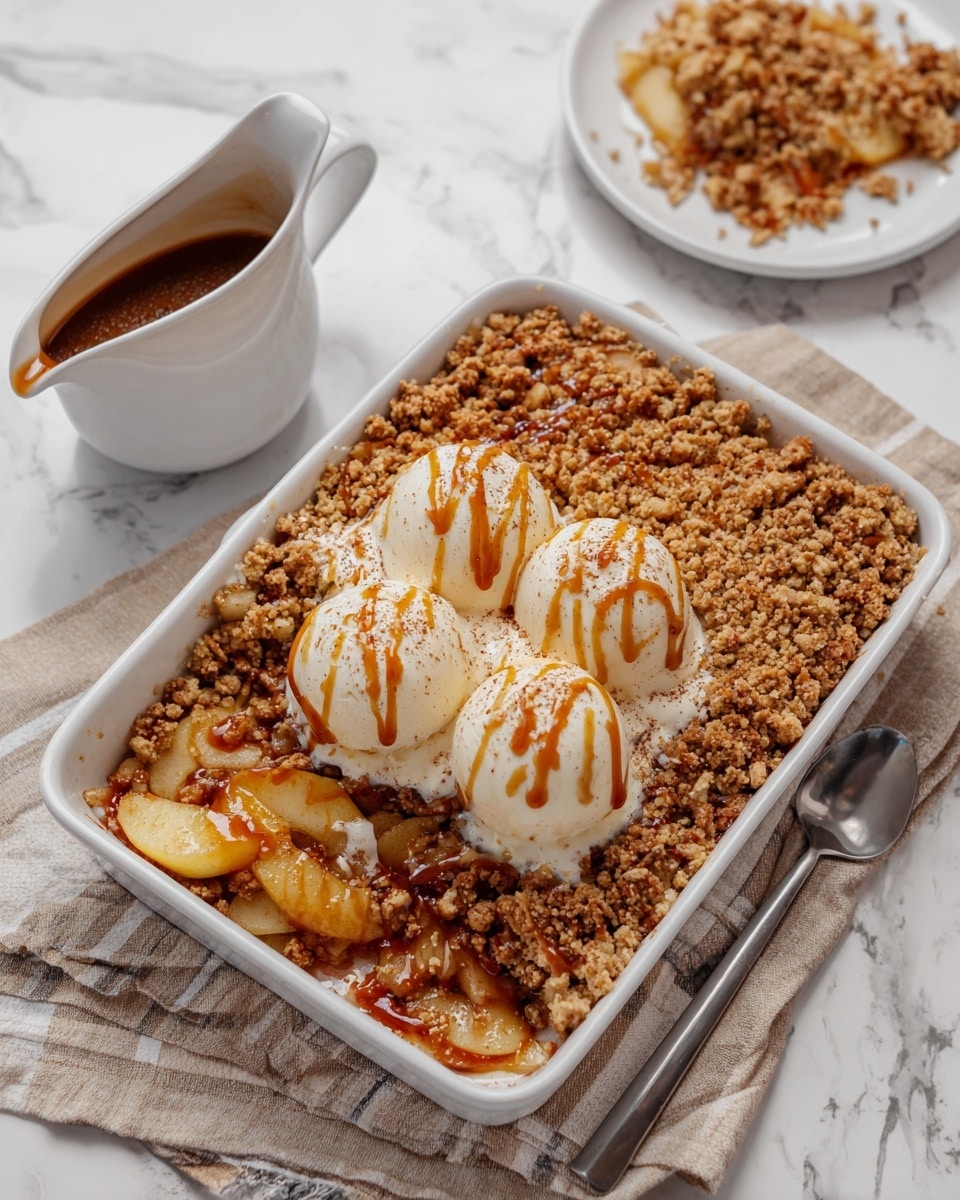
- Extra Crunch: A light sprinkle of extra streusel topping or a dusting of cinnamon can elevate the presentation and add another layer of texture.
- Warm Embrace: For an adventurous twist, try scooping your cold apple crisp ice cream over a warm brownie or even a leftover bowl of warm apple crisp. The contrast in temperatures and textures is truly divine.
- Garnish: A dollop of whipped cream or a drizzle of caramel sauce can add a touch of elegance.
Storing Your Treat:
To preserve the quality and prevent freezer burn, store your apple crisp ice cream in an airtight container in the coldest part of your freezer. When properly stored, homemade ice cream typically maintains its best quality for about 1-2 weeks. After that, while still safe to eat, its texture may begin to degrade.
Troubleshooting & Expert Insights:
- Too Icy? If your ice cream turns out too icy, review a few things: Was your base thoroughly chilled before churning? Were the apple crisp pieces chopped small enough? Larger pieces of apple have more water content, which freezes harder. Did you let the ice cream melt too much before refreezing?
- Not Creamy Enough? Ensure your ice cream machine bowl was frozen solid for the recommended time. A custard base (with egg yolks) naturally results in a creamier texture, so don't skip those!
- Flavor Balance: Don't be shy with the cinnamon and vanilla in the base. The cold temperature dulls flavors, so a slightly bolder base will shine through in the final product.
There's an undeniable satisfaction in crafting something so delicious from scratch, especially when it combines two beloved comfort foods into one extraordinary dessert. This homemade apple crisp ice cream recipe isn't just a treat; it's a celebration of flavor, texture, and the simple joy of creating something truly special in your own kitchen.
From the creamy, cinnamon-infused base to the tender, spiced apple pieces and crunchy streusel, every element works in harmony to deliver a truly unforgettable dessert experience. So, gather your ingredients, fire up your ice cream maker, and prepare to unlock the creamy bliss of homemade apple crisp ice cream. Your taste buds will thank you.
